
If you’re a Vermont homeowner staring up at your attic hatch and wondering whether you can tackle insulation removal yourself, you’re not alone. Across Windham County, Bennington, and communities throughout southern Vermont, homeowners with older homes are weighing the same question, especially when they see the price tag on professional services and think, “How hard can it be?”
The honest answer: it depends. DIY insulation removal in Vermont is absolutely possible in certain situations, but it’s also one of those projects where what you don’t know can genuinely hurt you. Vermont’s housing stock is among the oldest in the nation. Many homes in this region are 100, 150, even 200 years old, and they carry layers of history in their attics, including insulation materials that range from harmless to hazardous.
At Farnum Insulators, we’ve climbed into hundreds of Vermont attics. We’ve also seen the aftermath of DIY insulation removal attempts that went sideways: contaminated living spaces, damaged ceilings, and homeowners who unknowingly disturbed asbestos-containing materials. We’re not sharing that to scare you; we’re sharing it because we believe informed homeowners make better decisions.
Why Vermont Homeowners Consider Removing Old Insulation
Before diving into the how-to, it helps to understand the why. Vermont homeowners don’t typically remove insulation on a whim; there’s almost always a compelling reason behind the decision. Here are the most common drivers we see across southern Vermont:
Pest damage and contamination.
This is the number one reason we hear from homeowners. Mice, squirrels, and even raccoons are a fact of life in rural Vermont. They nest in insulation, compress it, tear it apart, and leave behind droppings and urine that create serious health concerns. Once insulation is contaminated by rodents, it needs to come out. There’s no effective way to sanitize it in place.
Moisture damage from ice dams and roof leaks.
Vermont winters are brutal on roofs. Ice dams form when heat escapes through poorly insulated attics, melting snow that refreezes at the eaves. The resulting water infiltration soaks insulation, dramatically reducing its thermal performance and creating conditions for mold growth. Years of minor roof leaks can saturate insulation without homeowners ever realizing it.
Outdated, compressed, or ineffective insulation.
Many older Vermont farmhouses have fiberglass batts that were installed decades ago. Over time, this insulation compresses, sags, and loses R-value. In some homes, we find insulation so thin and deteriorated that it’s doing almost nothing to keep heat in during January.
Mold growth from inadequate ventilation.
Poor attic ventilation, common in older Vermont homes that have been modified over the years, traps moisture and leads to mold colonization on insulation, sheathing, and framing. Removing the insulation is often part of a larger remediation effort.
Preparing for an energy-efficient insulation upgrade.
This is the most forward-thinking reason on the list. Homeowners who want to upgrade to modern, high-performance insulation often need to remove the old material first, especially when air sealing work needs to happen at the attic floor. Efficiency Vermont offers incentives of up to approximately $7,000 for comprehensive insulation upgrades, which motivates many homeowners to invest in doing the job right.
Renovation or remodeling projects.
Whether you’re finishing an attic space, rewiring an old home, or addressing structural issues, the existing insulation often has to come out to access framing, wiring, or plumbing.
Whatever your reason, understanding it clearly will help you determine the right approach and whether DIY attic insulation removal is feasible for your specific situation.
How to Remove Attic Insulation: Step-by-Step Process
If you’ve identified your insulation type, confirmed there are no hazardous materials present, and you’re confident the project is within your capabilities, here’s a detailed step-by-step guide for how to remove insulation from your attic.
✔️Step 1: Inspect and Identify the Insulation Type
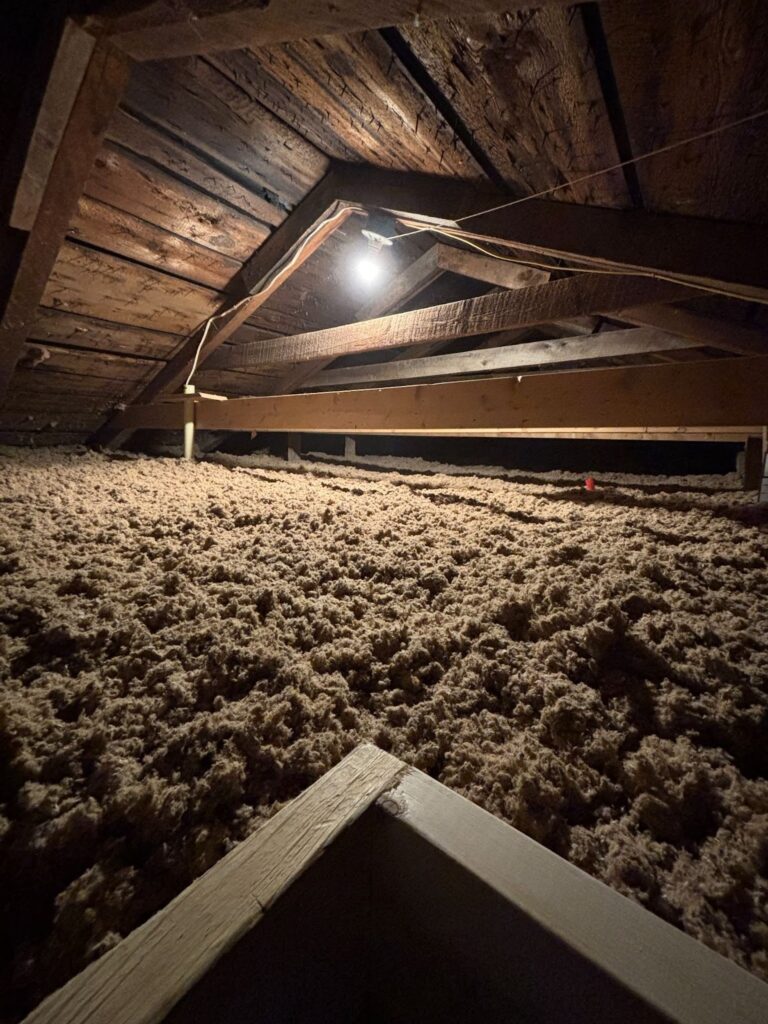
Before committing to the project, do a thorough inspection. Bring a bright headlamp, take photos, and document everything. Look for signs of pest activity (droppings, nesting material, chewed wiring), water damage (staining, discoloration, sagging), and mold (visible growth, musty odor). Note the insulation type in every area: different sections of the attic may contain different materials.
✔️Step 2: Test for Hazardous Materials
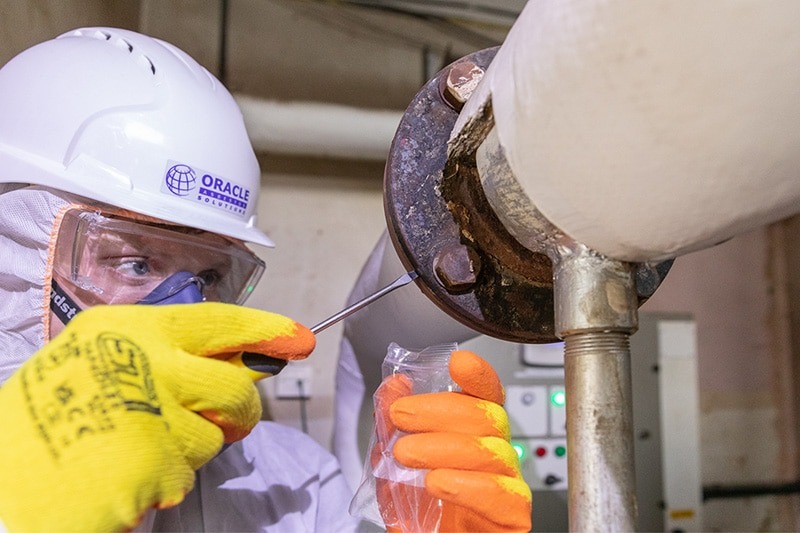
If your home was built before 1990, test for asbestos before disturbing any insulation, especially if you see vermiculite. You can collect samples yourself using a kit and send them to a certified lab, but hiring a certified inspector is the safest approach. Also check for lead paint on any nearby surfaces, framing, or ductwork you might disturb during the process.
✔️Step 3: Gather Proper Personal Protective Equipment (PPE)
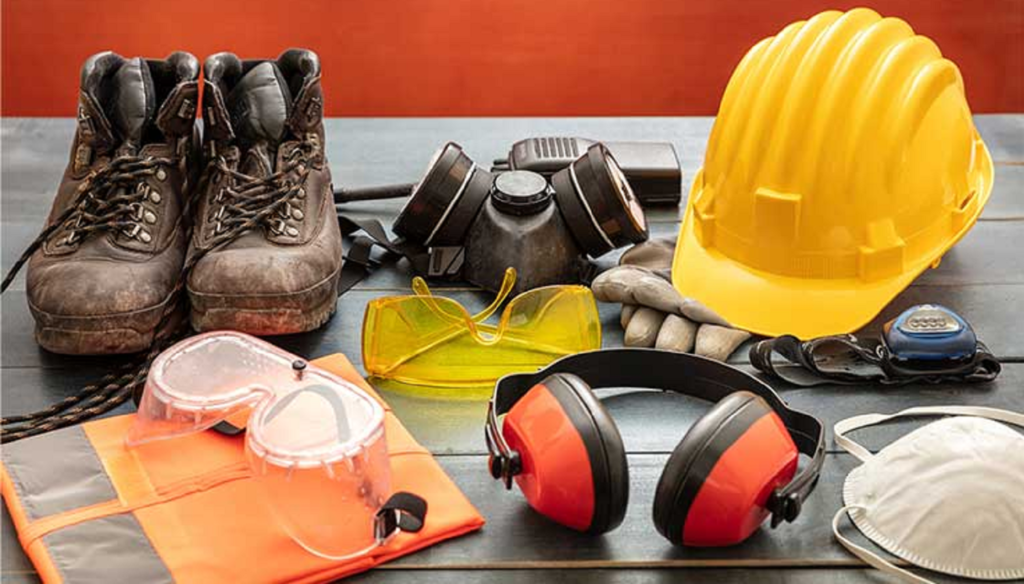
This is non-negotiable. You need: a P100 or N95 respirator rated for fiberglass and cellulose particles (not a basic dust mask), a disposable Tyvek suit to cover your entire body, sealed safety goggles (not open-frame safety glasses), heavy-duty work gloves, and work boots you can tape your suit legs over. Fiberglass in particular causes intense skin irritation, and the microscopic fibers can cause long-term respiratory issues with repeated exposure.
✔️Step 4: Seal the Attic Access Point
Before you start disturbing insulation, seal the perimeter of your attic hatch or door with plastic sheeting and painter’s tape. This prevents contaminated dust and fibers from migrating into your living space below. If your attic has a pull-down staircase, create a containment barrier around it. Consider running a box fan in a window to create negative pressure in the attic, exhausting dust outside rather than pushing it into your home.
✔️Step 5: For Blown-In Insulation, Rent an Insulation Vacuum
Blown-in cellulose and fiberglass require a HEPA-rated insulation removal vacuum. These commercial machines are available for rental from equipment rental companies, expect to pay $200 to $350 per day. The machine typically stays outside or in a garage while a long hose extends into the attic. Work in sections, methodically vacuuming the loose fill into collection bags. This is slow, physically demanding work, especially in tight attic spaces.
✔️Step 6: For Fiberglass Batts, Roll and Bag Carefully
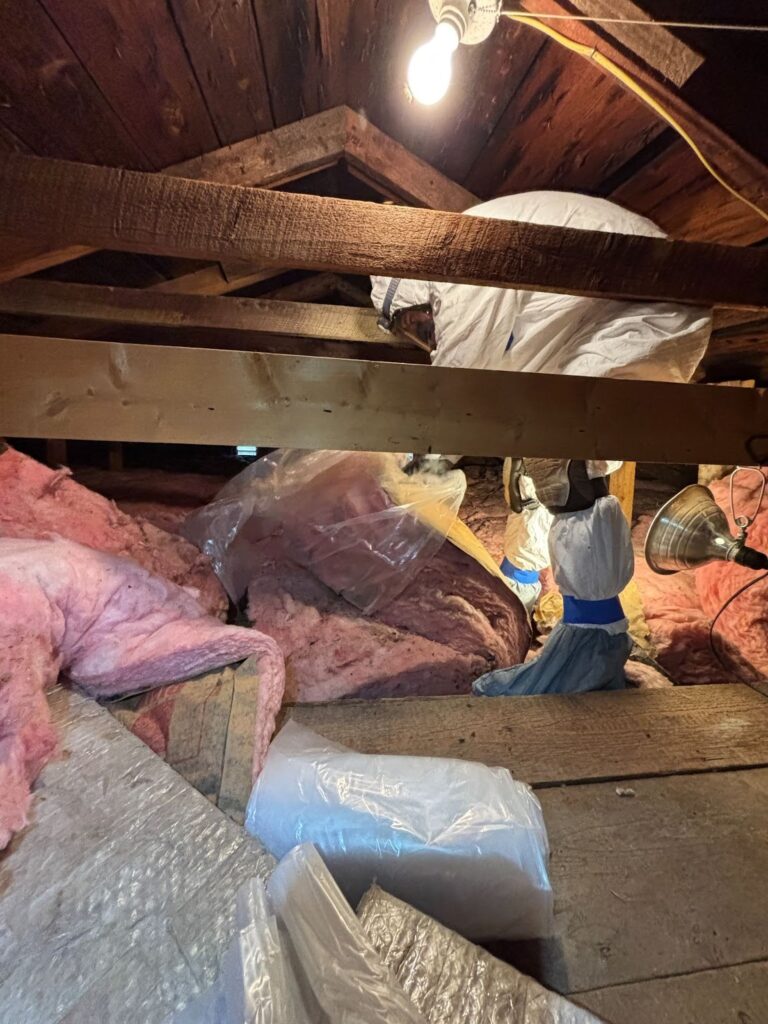
Fiberglass batts can be removed by hand. Roll each batt tightly and place it into heavy-duty contractor bags immediately. Don’t tear or rip the material; this releases significantly more airborne fibers. If batts are faced with kraft paper or foil, use a utility knife to cut them free from any stapled edges. Work from the far end of the attic back toward the access point so you’re not crawling over exposed joists.
✔️Step 7: Bag and Dispose According to Vermont Waste Regulations
Never compress insulation into regular household trash bags — they’ll tear, and your waste hauler won’t accept them anyway. Use heavy-duty contractor bags or the collection bags that come with rental vacuum equipment. Seal bags securely with tape. Insulation waste must be taken to an approved facility (more on Vermont-specific disposal below).
✔️Step 8: Clean All Surfaces Thoroughly
Once the insulation is removed, vacuum all exposed surfaces (joists, sheathing, attic floor) with a HEPA-rated shop vacuum. This removes residual fibers, dust, and debris, creating a clean slate for air sealing and new insulation installation. Inspect the now-exposed structure for any issues that were hidden by old insulation: damaged wiring, plumbing problems, structural concerns, or signs of ongoing moisture intrusion.
Health and Safety Risks You Shouldn’t Ignore
DIY insulation removal is not a casual project, and the health risks are real, not theoretical. Vermont’s older housing stock makes several of these hazards more prevalent than in regions with newer construction.
Fiberglass Exposure:
Fiberglass insulation is made of extremely fine glass fibers that become airborne when disturbed. These fibers irritate the skin (causing persistent itching and rashes), eyes (redness, watering, pain), and respiratory tract (coughing, difficulty breathing). While short-term exposure typically causes temporary irritation, repeated or prolonged exposure without adequate respiratory protection can contribute to chronic lung issues.
Asbestos in Vermiculite Insulation:
This is the most serious risk in pre-1990 Vermont homes. The Zonolite brand of vermiculite insulation, which was widely installed across New England, was sourced from a mine in Libby, Montana, contaminated with tremolite asbestos. Disturbing asbestos-containing vermiculite releases microscopic fibers that, when inhaled, can cause mesothelioma, asbestosis, and lung cancer, often decades after exposure. There is no safe level of asbestos exposure.
If you see vermiculite insulation in your attic (small, gray-brown, accordion-like pebbles) STOP immediately. Do not touch it, vacuum it, or attempt to remove it. Seal the attic and contact a certified asbestos testing professional. The Vermont Department of Health provides resources and referrals for asbestos testing and abatement.
Mold Spore Inhalation:
Moisture-damaged insulation is a breeding ground for mold, including potentially toxic species like Stachybotrys (black mold). Removing moldy insulation without proper containment and respiratory protection sends millions of spores into the air. For individuals with asthma, allergies, or compromised immune systems, this exposure can trigger serious respiratory reactions.
Rodent Contamination and Hantavirus:
Mouse and squirrel droppings in attic insulation are more than unpleasant: they pose a genuine health risk. Hantavirus, carried by deer mice common throughout Vermont, is transmitted through inhalation of dust contaminated with rodent urine, droppings, or nesting material. While hantavirus cases are rare in the Northeast, the CDC recommends treating all rodent contamination as potentially hazardous. Wet down droppings with a disinfectant solution before disturbing them, and never sweep or vacuum dry droppings.
Structural Hazards:
Vermont attics, especially in homes over a century old, present physical dangers that have nothing to do with insulation. Exposed, aging wiring, including knob-and-tube wiring still present in many southern Vermont homes, creates electrocution and fire risk. Weakened or undersized joists may not support your weight. Protruding nails, limited headroom, and poor lighting compound these hazards.
The bottom line: if you’re going to do this work yourself, respect the risks. Full PPE isn’t optional, and if you encounter anything unexpected (vermiculite, extensive mold, animal remains), it’s time to stop and reassess.
When DIY Removal Makes Sense (and When It Doesn’t)
Let’s be straightforward about this. At Farnum Insulators, we’d rather give you an honest assessment than see you take on a project that puts your health or home at risk. Here’s how to evaluate whether DIY insulation removal in Vermont is realistic for your situation.
DIY removal can make sense when:
– ✅ You’re dealing with fiberglass batts (the easiest type to remove by hand)
– ✅ The attic is easily accessible with adequate headroom and a solid floor or walkable joists
– ✅ No hazardous materials are present (confirmed through testing if your home is pre-1990)
– ✅ The area is relatively small — a section of attic, not a sprawling 1,500-square-foot farmhouse attic
– ✅ There’s no significant mold, pest contamination, or moisture damage
– ✅ You’re physically capable of working in a confined, hot, uncomfortable space for extended periods
– ✅ You have access to proper PPE and are committed to using it throughout the entire job
DIY removal is NOT recommended when:
– ❌ You have blown-in cellulose or fiberglass across a large attic — the vacuum rental adds cost and complexity, and the job takes far longer than most people expect
– ❌ Vermiculite insulation is present or you suspect asbestos in any form
– ❌ There’s significant mold growth — proper mold remediation requires containment, negative air pressure, and specialized cleaning that goes beyond simple insulation removal
– ❌ Heavy pest contamination exists (extensive droppings, dead animals, saturated insulation)
– ❌ You need to remove insulation from cathedral ceilings, knee walls, or other hard-to-access spaces where working safely is nearly impossible for one or two people
– ❌ Spray foam insulation is involved — removing cured spray foam requires professional cutting and scraping equipment, and the process generates toxic particulates
– ❌ You have health conditions (asthma, COPD, immune deficiencies) that make respiratory exposure particularly dangerous
Cost Comparison: Doing It Yourself vs. Hiring a Professional
| Cost Comparison: DIY vs. Professional Insulation Removal | |
|---|---|
| Expense | Estimated Cost |
| 🔨 DIY Insulation Removal | |
| Insulation vacuum rental (HEPA-rated) | $200–$350/day |
| PPE (respirator, Tyvek suit, goggles, gloves) | $50–$100 |
| Heavy-duty contractor bags & supplies | $50–$100 |
| Disposal fees (transfer station or dumpster) | $150–$400+ |
| Total materials/equipment | $450–$950+ |
| Your labor | 1–3 full days (or more) |
| ✅ Professional Insulation Removal | |
| Professional removal (varies by attic size and insulation type) | Varies — request a quote |
| Includes: equipment, labor, disposal, cleanup | All inclusive |
| Often bundled with re-insulation | Bundled pricing available |
| Efficiency Vermont incentives (for full upgrade) | Up to ~$7,000 offset |
The Hidden Costs of DIY That People Forget:
The line-item comparison doesn’t tell the whole story. Here’s what’s harder to put a dollar value on:
– Your time: A full weekend (often longer) of physically grueling work in a cramped, uncomfortable space. What’s your time worth?
– Equipment learning curve: Renting an insulation vacuum doesn’t mean you know how to operate it efficiently. First-timers often take two to three times longer than experienced crews.
– Potential medical costs: Inadequate PPE or unexpected exposure to mold, asbestos, or rodent contamination can result in doctor visits, testing, or worse.
– Home damage: Stepping through a ceiling, knocking loose a light fixture, or damaging wiring creates repair costs that quickly exceed what you saved by going DIY.
– Rebate eligibility: Some Efficiency Vermont incentive programs require documentation and professional installation standards. DIY work may not qualify for certain rebates that would otherwise offset the cost of professional service.
Next Steps: Making the Right Choice for Your Vermont Home
You’ve made it through the complete guide, which means you now know more about DIY insulation removal in VT than most contractors would ever share with you. Let’s bring it home with the key takeaways.
✔️Know what insulation you have.
Get into your attic with a flashlight and identify the material before making any plans. Different insulation types require different approaches, equipment, and safety precautions.
✔️Test for hazards before touching anything.
If your Vermont home was built before 1990, asbestos testing isn’t optional, it’s essential. The same goes for assessing mold and rodent contamination. Five minutes of testing can prevent a lifetime of health consequences.
✔️Understand the full scope of work and cost.
DIY insulation removal isn’t just about pulling out old material. Factor in equipment rental, PPE, disposal fees, your time, and the physical demands of the work. Compare that honestly against professional pricing, especially when Efficiency Vermont incentives are part of the equation.
✔️Don’t hesitate to ask for professional guidance.
There’s no shame in deciding that a project is beyond your comfort level, your skill set, or your risk tolerance. The smartest homeowners are the ones who know when to call in help.
Frequently Asked Questions About DIY Insulation Removal in Vermont
Can I remove insulation from my attic myself?
Yes, in some cases. If your attic has fiberglass batts, is easily accessible, and contains no hazardous materials like asbestos, DIY removal is feasible with proper PPE and equipment. However, blown-in insulation requires a specialized vacuum, and any suspected asbestos (common in pre-1990 Vermont homes with vermiculite) should be professionally tested and handled. Always prioritize safety over savings.
How much does it cost to remove insulation in Vermont?
DIY removal typically costs $400–$900+ when you factor in vacuum rental, PPE, disposal fees, and supplies, plus a full weekend of labor. Professional removal varies by attic size and insulation type but is often bundled with re-insulation services. Efficiency Vermont incentives (up to approximately $7,000) can significantly offset the cost of a full insulation upgrade, making professional service more affordable than many homeowners expect.
How do I know if my old insulation contains asbestos?
You can’t tell by looking at it. Vermiculite insulation (small, gray-brown pebble-like material), especially the Zonolite brand, was commonly installed in New England homes before 1990 and may contain asbestos. If you spot vermiculite in your attic, do not disturb it. Contact a certified asbestos testing lab or your local Vermont health office for proper sampling before any removal work begins.
Where do I dispose of old insulation in Vermont?
Old insulation is classified as construction debris in Vermont and cannot go in regular trash pickup. You’ll need to bring it to an approved transfer station or rent a dumpster from a licensed hauler. Check with the Windham Solid Waste Management District for local guidelines. Asbestos-containing insulation requires licensed abatement professionals and specialized disposal — never attempt to dispose of it yourself.
Should I remove old insulation before adding new insulation?
Not always. If existing insulation is clean, dry, and undamaged, new insulation can sometimes be added on top. However, removal is recommended when insulation is contaminated by pests, moisture, or mold; when it’s severely compressed and no longer effective; or when you need access to the attic floor for air sealing work. An energy audit can help you determine the best approach for your specific home.
What is the best replacement insulation for Vermont homes?
For attics, cellulose insulation is an excellent choice: it’s made from recycled materials, provides strong thermal performance, and fills gaps effectively. For basements and crawl spaces, spray foam insulation in Vermont offers a higher R-value and superior moisture resistance, which is critical in Vermont’s humid conditions. Basement insulation and crawl space insulation each benefit from materials suited to their unique moisture and temperature challenges. The right choice depends on the area of your home and your specific energy goals.
We serve homeowners across Windham County, Bennington, and surrounding Vermont communities, and every project starts with a free, honest estimate.
Get a Free Estimate Today! →
Call (802) 387-5005 or reach out online. We’ll assess your situation, answer your questions, and help you figure out the best path forward.